How-to Guides
Module Guides
Video Guides
How-to Guides
Images
Reaching the Media Library
- The Media Library can be reached through the editing view of any module that requires images.
- If there is already an image added to the module, first click the X at the top right of the image.
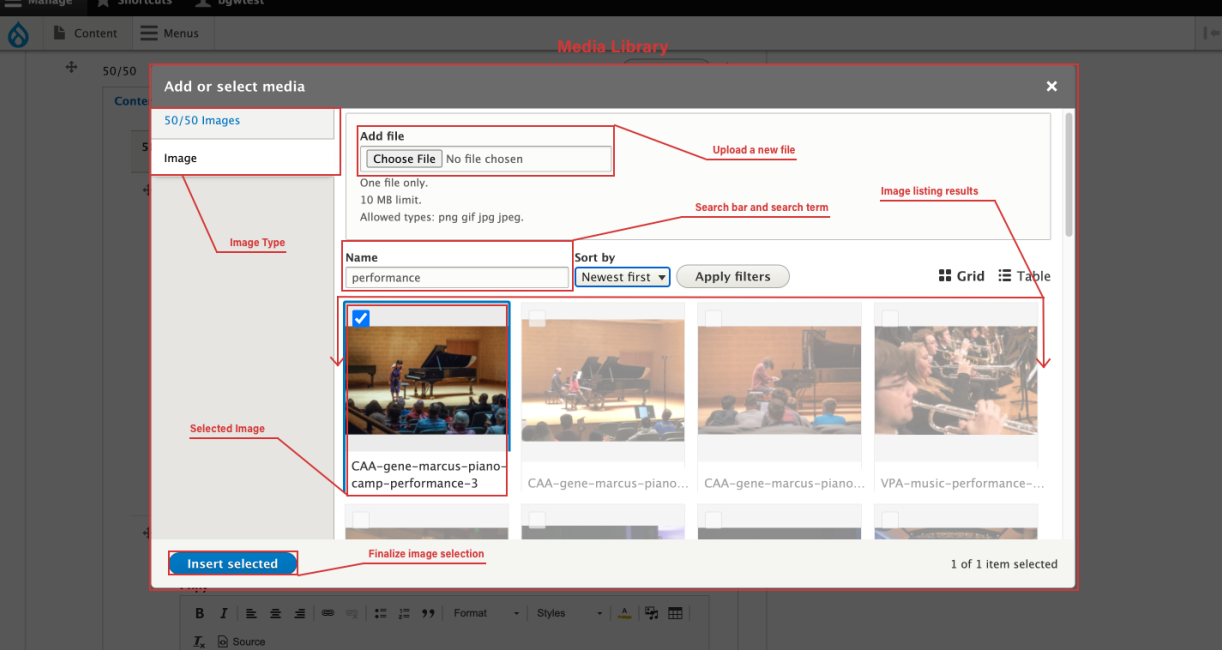
- Then click the Add Media button to reach the Media Library, which gives you all the tools you need to add an image.
Finding Images
The Media Library is full of images taken across campus that we have already uploaded for your use.
- Use the search bar labeled Name near the top of the Media Library, and enter general terms such as studying or outdoor, or more specific terms relevant to your unit, like music or performance.
- Click on the image to select it, and then press the Insert Selected button near the bottom to finish.

Uploading Images
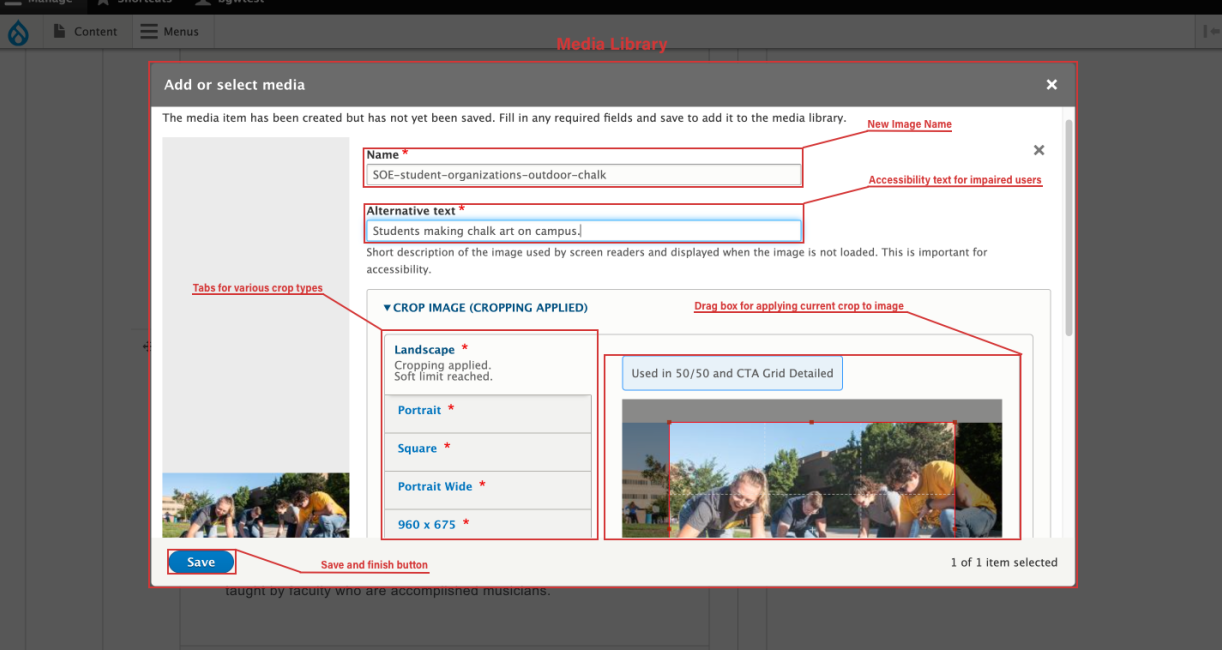
It is easiest and safest to use images already in the Media Library. But in cases where you have your own images to upload, you can use the Choose File button at the top of the Media Library. You’ll then be presented with three fields: Name, Alternative Text, and Crops.
- Name: Follow this general format so that your images are easily searchable in the Media Library.
- unit-keywords-type
- Unit: Prefix used to associate images with a college, school, department, or other unit. (vpa, etcs, cola, cos, etc.)
- Keywords: Search terms that describe the image. Try to use less than four words. (students-smiling-library)
- Type: Specific use/format for image, if there is one. (headshot, landscape, etc.)
- If you search the Media Library, you can find many examples of this naming convention.
- unit-keywords-type
- Alternative Text: Describe your image in a short phrase, such as “Portrait of a VPA student smiling.” This is important for visually impaired users of our site who use screen-reading technology, which reads the text aloud on the page.
- Crops: You’ll see a list of tabs named by crop type, such as Landscape, Portrait, and Hero. These are different sizes that the image might display based on which module it’s inserted into. Going through this process now means that after uploading, your image can easily and dynamically be inserted anywhere on the site. Click each tab, and drag the box so that the subject is well positioned (even if you want to keep the box in the default position, you have to at least click it so that the system recognizes the crop).
- Click Save when you’re done with all fields.

Image Upload Restrictions
- Copyright: When uploading a new image, you must not upload an image owned by someone else or that was found elsewhere on the internet, at risk of exposing the university to a copyright lawsuit.
- Accessibility: You should avoid images that contain text, as this text is not accessible by users that need screen-readers to navigate the website.
- File Size: Try not to upload images any larger than 2MB. If your images are much larger than this, they will slow down the site and display improperly. If you need help downsizing your images, try tinypng.
Image Types
In certain modules, you may find that multiple image types are listed on tabs at the left of the Media Library. For example, in 50/50 modules, you’ll see both Image and 50/50 Image as selectable types. These will each have slightly different libraries of images to choose from, but any images you find in either will work just fine. In most cases, the Image type will have the most to choose from, and you should privilege that type when uploading images as well.
Reordering Images
In modules that have multiple images arranged alongside each other, you can click and drag the images to reorder them.
Styling Your Image
In some cases, like in 50/50 modules, there will be additional styling options for your image once you’ve inserted it into the module. In the 50/50, you can put a textured bar on the top or bottom of the image to give it color and branding, or you can change the crop of the image. Changing the crop has a dramatic effect on the presentation of the image. The Portrait crop is thin and tall, the Landscape crop is wide, and there are many crops in between. When experimenting with this, always check to see how it displays after the page saves to make sure no important parts of the image, such as the face of the subject, have been cut off.