How-to Guides
Module Guides
Video Guides
How-to Guides
The WYSIWYG Text Editor
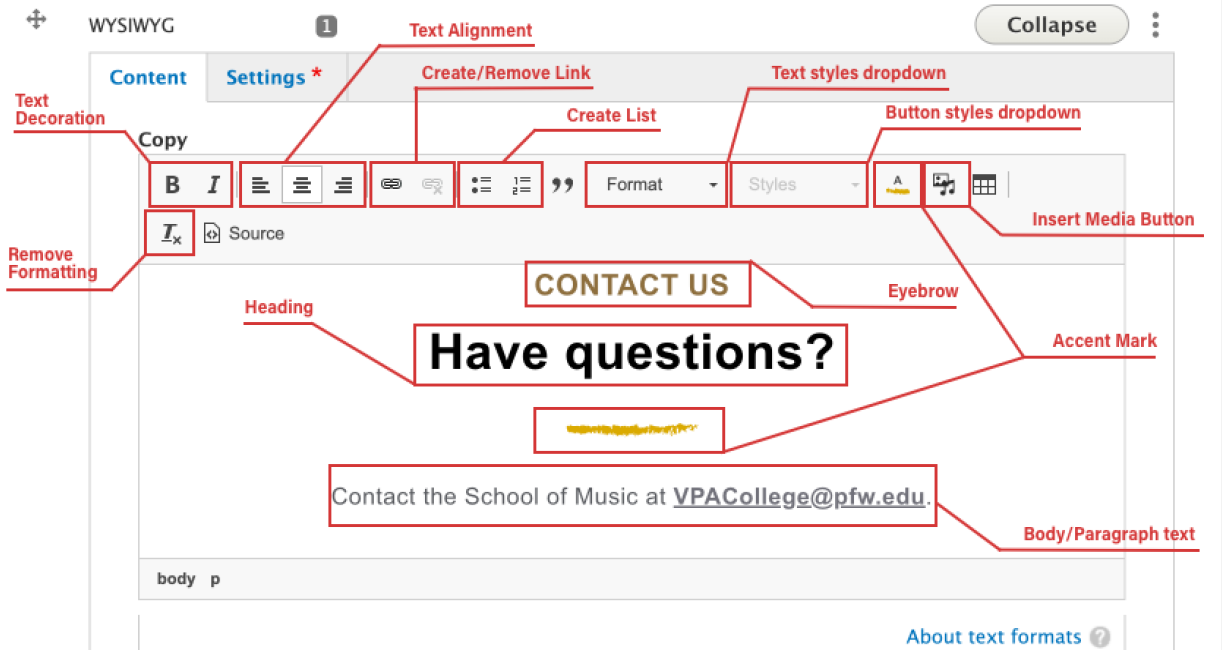
WYSIWYG stands for What You See Is What You Get. It is a text field with extra features that allows you to style the text while you’re editing. It also shows you exactly how the text will appear on the live page, even while in editing view. This module has a few key elements you should know about.
Default: Whenever a new WYSIWYG field is created, it’ll have default placeholder text in the stylistic arrangement recommended for that module. These styles have been carefully chosen for every module, so we recommend you do not change the style and arrangement of these text blocks—simply replace the placeholder text with your copy.
Styling: If you do have good reason to change the styles set up by the placeholder text, refer to the guide below to see which features correspond to which buttons.
Don’t Copy and Paste: If you copy and paste text from Microsoft Word or other rich-text sources into the WYSIWYG, you will likely see errors when trying to style your text. To avoid headaches like this, either type the copy manually or paste it into an app like Notepad which only supports plain text and will clean it up automatically. You can then copy the plain text and paste it into the WYSIWYG. You can also highlight the copy after pasting and press the Remove Formatting button.
Eyebrow: In many modules, the placeholder text will be arranged in three hierarchical blocks: eyebrow, heading, and body.
- Heading and body will be familiar to most web editors. Use the heading to give users a simple label for what they’ll read in the body. Use the body to house the information you want to communicate.
- The eyebrow is a bit less obvious and has multiple uses.
- It can be used simply as a separate heading, which describes the same content in a different way. For example, “Have Questions?” or “Contact Us.”
- It can be used to provide a different voice than the headline that’s more persuasive rather than descriptive. For example, “Dean’s Student Grant Application” or “Fund Your Passion.”
- It can be used to provide a different piece of information related to the content. For example, “School of Music” or “Degree Programs.”
- And if you don’t have a use for it, it’s always an option to delete the eyebrow, leaving only the heading and body.
Buttons: To insert a button, first, change some copy into a link by highlighting it and using the Create Link button. You can then style that link copy using the button styles found in the Styles drop-down menu, (not the Format drop-down menu).
Inline Images: It is not recommended that you use images inside a WYSIWYG field. In most cases, it is better to choose a module that is designed for image use, like a 50/50. If you must use images in a WYSIWYG, you have to upload them to the media library first using the Image/Media button at the top of the editor. If you try to copy and paste the image in without going through the media library, it won’t work. For more information on images, see this guide.
